Image Slider

Guest Post: Make Up Tips On Looking Matte


 First time here? You may want to subscribe to our RSS feed
   

Hi dolls! We are HettyAsh & Asiabee – a dynamic duo with a unique perspective on all things concerning everyday life and motivational inspiration. We publish weekly blogs which cover everything from fashion & beauty to lifestyle and self-help. You can find us at www.hettyashasiabee.com. We are a bubble of energy so we hope to see you over at our website.

So girlies, let’s get started shall we?

‘Asiabee’s Oriental Matte Look’ list of products:

The first step is to apply the Mac Prep + Prime crème to your face. Only apply it to the areas that tend to shine the most. We combined Iman BB crème with Iman Second To None Crème foundation and mixed to achieve the right skin tone. This mix also helps create a nice glow. 

The second step is to brush the Bobbi Brown Sheer Finished Pressed Powder with a good quality powder brush (we used Mac's brand) across your face, until everything has evened out. This helps to give the matte look. This particular powder, we would recommend for when you're taking photos and filming as it helps reduce shine.

The next product we used was the Mac Burgundy Times Nine Eye Shadow. We used the glossy gold and purple colours. We wanted HettyAsh's eyes to stand out and be the main attraction. It's great for those who have small eyes as it helps accentuate them.

The mascara comes next - we used the L'Oreal Voluminous mascara which has a curved brush, but feel free to use any great mascara that is available.

The eyeliner we used was the Rimmel London rich brown waterproof eye definer. We love this particular product as the colour is perfect for those with small eyes. We find that applying black eyeliner all across your eyelids can sometimes give you the 'goth' eye look.

The Beauty Blush Warm Sand by Fashion Fair helps to define your cheek bones and the colouring provides a different contrast as compared to the rest of the makeup.

We find you can have your makeup done perfectly but if your lips are not done right, it can spoil the whole look. We used Mac's Chestnut lip pencil to outline the lips to give it a fuller look and tidy the appearance of the lipstick. For the inside of the lips, we used Fashion Fair Siren.

The final step is to re-apply the Bobbi Brown Sheer Finished Pressed Powder to finalise the look.

And voila...
If you want to see snippets of how this makeup was applied, come on over to our Instagram page. To keep updated with our fun antics, tips, advice and posts, check us out on social media - Twitter and Instagram @HettyAsia. 

Hope you enjoyed this blog post! If you'd like to guest post on this blog, please see details on the guest post page.

Twitter  ||  Facebook  ||  BlogLovin  || Pinterest 

Guest Post: Spring Drugstore Eye Makeup

 First time here? You may want to subscribe to our RSS feed
   
Drugstore eye makeup

So first let me introduce myself, Hey! I'm Natalia from natalialaurel.blogspot.co.uk. I like to blog about Beauty - anything from reviews, hauls, and favourites. I also post a few photography posts from any travel trips or just an update of what I've been editing on Photoshop. I hope to see you over on my blog soon!

Let's get on with this eye makeup look...
For this look you'll only need 4 products, an eye shadow palette, a cream eye shadow, and eyeliner and essentially a mascara. And since this look is so easy and this blog post would be so short if I only told you what to apply, I will also review each one of these products too, soooo keep reading.

The products that i used:

This whole eye makeup look will cost you £25.96 altogether, which can I say is a good price for what you're paying for - ahem a whole 12 eye shadow palette and a creme eye shadow that will last you for years?!


So first, apply some of the Maybelline Cream Gel Eye Shadow in 'Pink Gold' but only focusing on the lid. This eye shadow applies really smoothly but you do have to work quickly with it because it does tend to set really quick and you won't have enough time to blend it out etc. Since this is a cream eye shadow, it will set and act like an eye shadow primer which means it will prevents creasing and ensures no smudge for as long as 24 hours. These don't claim to be waterproof but they do not come off at all when in contract with water or even when you smudge it by accident. This line comes in 11 different metallic shades and right now there's an offer in Boots for 3 for 2 on Maybelline products!

Sleek Au Naturel Palette

Then I used the shade 'Bark' in the crease just to give the eyes more depth and shadow from the Sleek Au Naturel Palette. You can see this shade in the swatch, but in the palette it's the third shade counting from the bottom left. I chose this shade because it's quite a cool toned shade which looks so pretty when paired to that golden rosy shade. It's quite a grey toned brown but it's not ashy. So now for my opinion on this palette, I have mixed reviews on this is because the matte shades in this palette are quite sheer which means they're only suitable for subtle looks like this one. They are build-able but it would take a lot of blending to achieve that really smoky eye makeup. As for the shimmery shades, they are great and really pigmented. To apply the crease shadow, I used my Sigma E25 Blending Brush which is my favourite brush for blending! 

Spring drugstore eye makeup

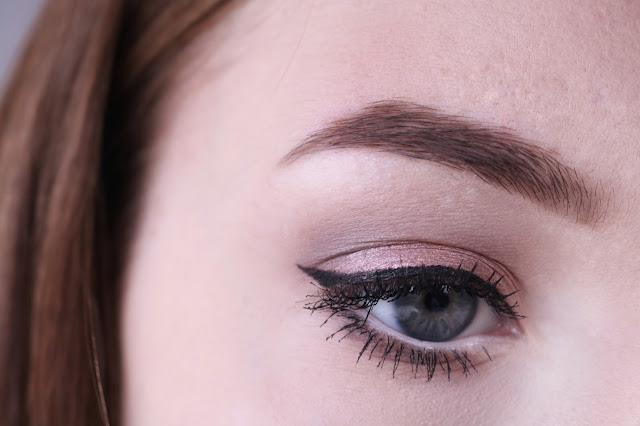
Lastly, using the Maybelline Master Precise Eye Liner to create a little flick just to extenuate the eye, make sure you keep it quite close to the lash line. You don't want to go too thick with this because this is just a gentle and pretty eye look, a thick line wouldn't look good with this because the eye shadow is really light. When applying, use the side of it to create the line on the lash line and then to create the flick, use the pointed tip first then drag the eye liner and join it with the line you just drew. I hope that made sense to you, i use the standard way of applying eyeliner so if you're not sure of how to do so, use YouTube tutorials as a video guidance. I really like this eye liner because it has a thin felt tip nib and its so easy to apply. I find that this eyeliner stays really black for a long time until the product starts to dry up, it also stays on your eyes throughout the whole day.

And lastly, for the mascara i'm using my favourite drugstore mascara, Maybelline Colossal Waterproof mascara after curling my lashes. You can read a full review on this mascara over on my blog, click here. I'm just using about 2 coats on top and bottom lashes just to open up the eyes more. I found that this mascara is perfect when you curl your lashes every day because it keeps the curl all day long and doesn't weigh down your lashes whatsoever. It is a waterproof mascara which is great for hotter months but this does mean you need to find a good eye makeup remover - I find that the Clinique Take The Day Off Makeup Remover works wonders with any type of waterproof makeup and most importantly, it doesn't irritate your eyes whilst removing mascara.

So as you see, this look is very simple and really easy to do, and also easy to recreate since i was using affordable products.

Hope you enjoyed this blog post! If you'd like to guest post on this blog, please see details on the guest post page.

Twitter  ||  Facebook  ||  BlogLovin  || Pinterest 


Review: The Body Shop Vitamin C Glow Boosting Moisturiser

 First time here? You may want to subscribe to our RSS feed
   

Hi lovelies, Alessia from Velvet Lashes here with a beauty review. The Body Shop has always been a brand I have liked but never highly rated when it came to the skincare they offered, from Vitamin E to Tea Tree, they offered a good variety but nothing that stood out to me or proved to me it was worth the wow factor, but all that changed over the last year or so when my eyes caught sight of positive reviews with the latest launches, so here is my take on the "Vitamin C Glow Boosting Moisturiser". 

I heard good things about this product and water to try it out for myself especially when it claims to boost "dull, tired, frumpy skin" this is something my skin needs urgent help with lately after the arrival of my second child.

bbloggerschat, the body shop, glow boosting moisturiser, the body shop skincare, best highstreet moisturiser,

The packaging is simple, clean and appears high end. It has a matte black lid which I like as I feel matte black looks more expensive than the shiny glossy packaging. The packaging reflects the product's "glow boosting" title with a bright orange colour and the cream is packed with vitamin c, and to me vitamin c means oranges! Is it just me that thinks that?

The scent is not overpowering at all, instead it has a refreshing orange scent with a hint of a sweet flower hiding amongst the orange; a scent I love to smell in the mornings, it reminds me of being on my Nonnas balcony amongst her orange trees.

I have used this cream non-stop since purchasing it. This has been the product that made me fall in love with the brand again, so much so I became a body shop consultant! The cream is a light orange colour which feels refreshing and light to touch. I use this cream every morning to wake me up which it sure does; I feel refreshed and ready to face the world. The product claims to "refine texture for smoother, softer-feeling skin". What a claim to make! After a week of using this cream, I would say my skin is brighter, happier and appears to be smoother with a glow that makes my makeup love my skin.

bbloggerschat, the body shop, glow boosting moisturiser, the body shop skincare, best highstreet moisturiser,


If you're a beauty blogger interested in guest posting on this blog, please check out our guest post page for all the details.

Have you tried this product before? What are your thoughts?

Twitter  ||  Facebook  ||  BlogLovin  || Pinterest 
----------------------------------------------------------------------------------------------------
Nia & Alessia